This is the multi-page printable view of this section. Click here to print.
How-to guides
- 1: How to Register a Bare Metal Machine (ISO)
- 2: How to Register a Bare Metal Machine (PXE/iPXE)
- 3: How to Register a GCP Instance
- 4: How to Register an AWS EC2 Instance
- 5: How to Register an Azure Instance
- 6: How to Create a Service Account Kubeconfig
- 7: How to Scale Down a Cluster
- 8: How to Scale Up a Cluster
- 9: How to Register a Hetzner Server
- 10: How to File an Issue
- 11: How to install talosctl
- 12: How to Create a Cluster
- 13: How to Create a Patch For Cluster Control Planes
- 14: How to Create a Patch For Cluster Machines
- 15: How to Create a Patch For Cluster Workers
- 16: How to Create a Hybrid Cluster
- 17: How to Use Kubectl With Omni
- 18: How to Install and Configure Omnictl
- 19: How to Deploy Omni On-prem
- 20: How to Back Up On-prem Omni Database
- 21: How to Configure Keycloak for Omni
1 - How to Register a Bare Metal Machine (ISO)
This guide shows you how to register a bare metal machine with Omni by booting from an ISO.
Dashboard
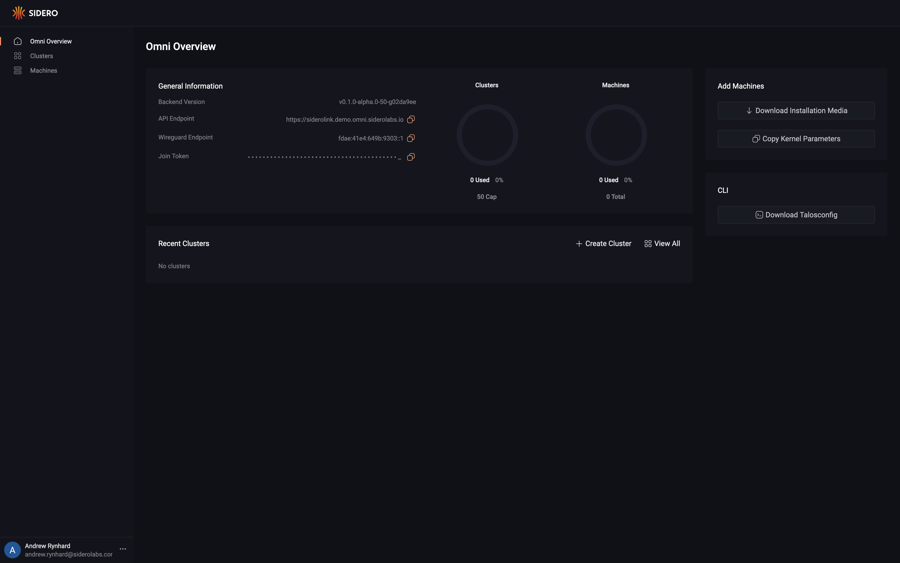
Upon logging in you will be presented with the Omni dashboard.
Download the ISO
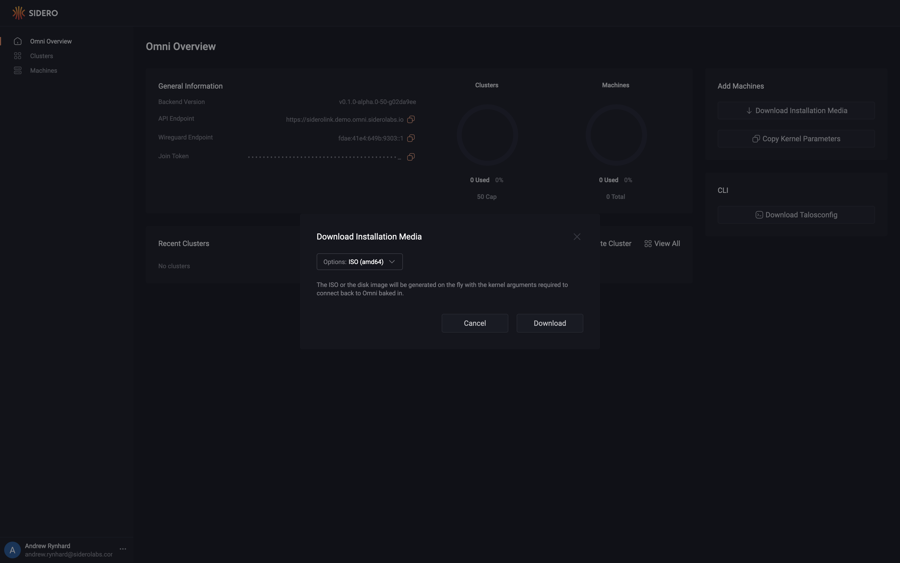
First, download the ISO from the Omni portal by clicking on the “Download Installation Media” button.
Now, click on the “Options” dropdown menu and search for the “ISO” option.
Notice there are two options: one for amd64 and another for arm64.
Select the appropriate option for the machine you are registering.
Now that you have selected the ISO option for the appropriate architecture, click the “Download” button.
Write the ISO to a USB Stick
First, plug the USB drive into your local machine. Now, find the device path for your USB drive and write the ISO to the USB drive.
diskutil list
...
/dev/disk2 (internal, physical):
   #:                       TYPE NAME                    SIZE       IDENTIFIER
   0:                                                   *31.9 GB    disk2
...
In this example disk2 is the USB drive.
dd if=<path to ISO> of=/dev/disk2 conv=fdatasync
$ lsblk
...
NAME   MAJ:MIN RM  SIZE RO TYPE MOUNTPOINTS
sdb      8:0    0 39.1G  0 disk
...
In this example sdb is the USB drive.
dd if=<path to ISO> of=/dev/sdb conv=fdatasync
Boot the Machine
Now that we have our bootable USB drive, plug it into the machine you are registering. Once the machine is booting you will notice logs from Talos Linux on the console stating that it is reachable over an IP address.
Warning
Machines must be able to egress to your account’s WireGuard port and port 443.Conclusion
Navigate to the “Machines” menu in the sidebar. You should now see a machine listed.
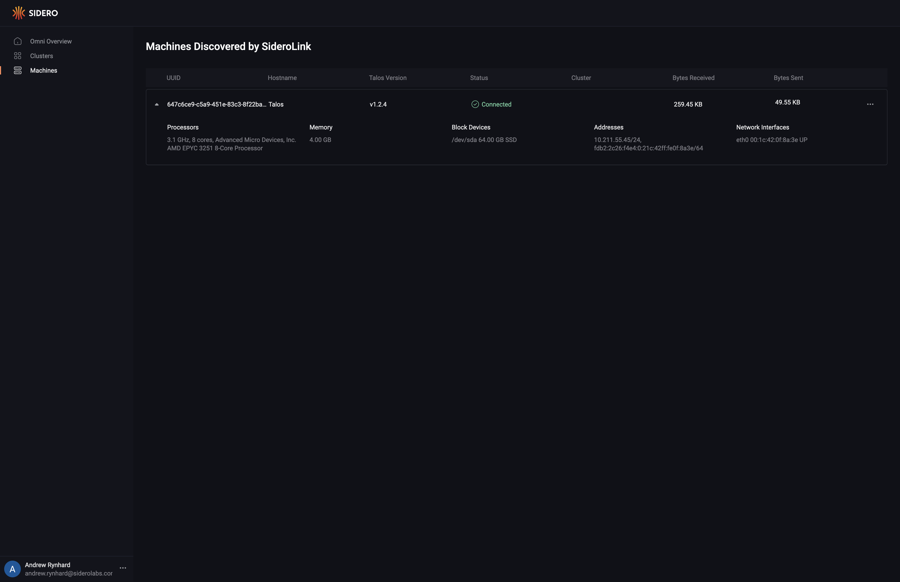
You now have a bare metal machine registered with Omni and ready to provision.
2 - How to Register a Bare Metal Machine (PXE/iPXE)
This guide shows you how to register a bare metal machine with Omni by PXE/iPXE booting.
Copy the Required Kernel Parameters
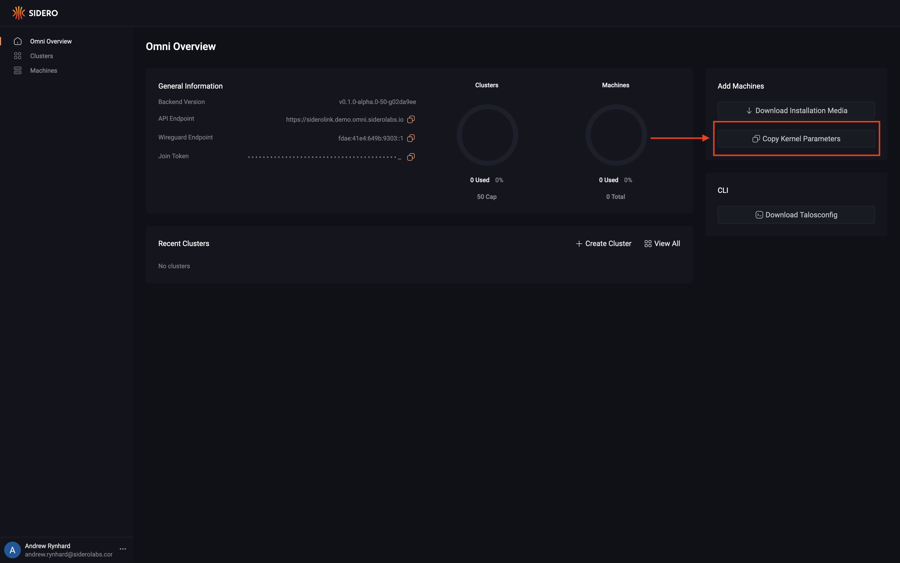
Upon logging in you will be presented with the Omni dashboard. Click the “Copy Kernel Parameters” button and save the value for later.
Download the PXE/iPXE Assets
Download vmlinuz and initramfs.xz from the release of your choice (Talos Linux 1.2.6 or greater is required), and place them in /var/lib/matchbox/assets.
Create the Profile
Place the following in /var/lib/matchbox/profiles/default.json:
{
  "id": "default",
  "name": "default",
  "boot": {
    "kernel": "/assets/vmlinuz",
    "initrd": ["/assets/initramfs.xz"],
    "args": [
      "initrd=initramfs.xz",
      "init_on_alloc=1",
      "slab_nomerge",
      "pti=on",
      "console=tty0",
      "console=ttyS0",
      "printk.devkmsg=on",
      "talos.platform=metal",
      "siderolink.api=<your siderolink.api value>",
      "talos.events.sink=<your talos.events.sink value>",
      "talos.logging.kernel=<your talos.logging.kernel value>"
    ]
  }
}
Update siderolink.api, talos.events.sink, and talos.logging.kernel with the kerenl parameters copied from the dashboard.
Place the following in /var/lib/matchbox/groupss/default.json:
Create the Group
{
  "id": "default",
  "name": "default",
  "profile": "default"
}
Once your machine is configured to PXE boot using your tool of choice, power the machine on.
Conclusion
Navigate to the “Machines” menu in the sidebar. You should now see a machine listed.
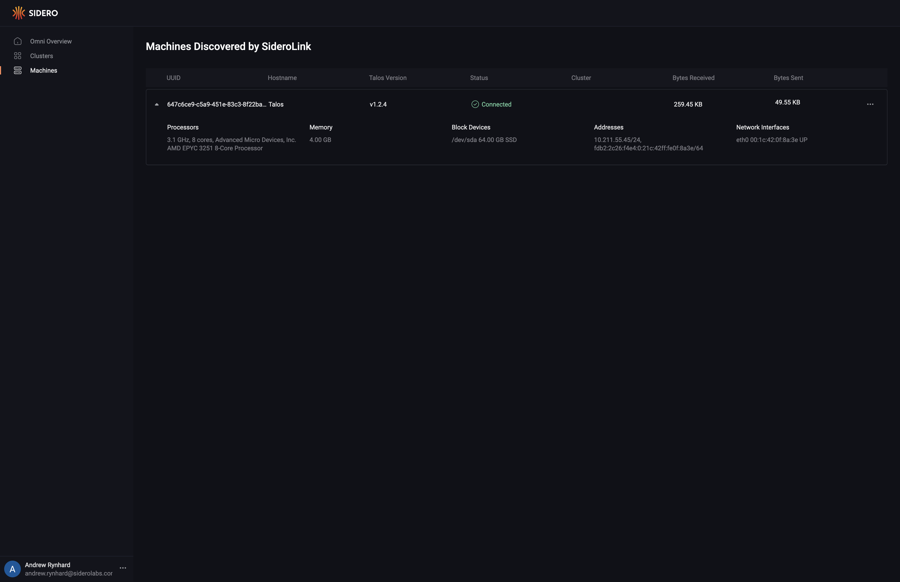
You now have a bare metal machine registered with Omni and ready to provision.
3 - How to Register a GCP Instance
This guide shows you how to register a GCP instance with Omni.
Dashboard
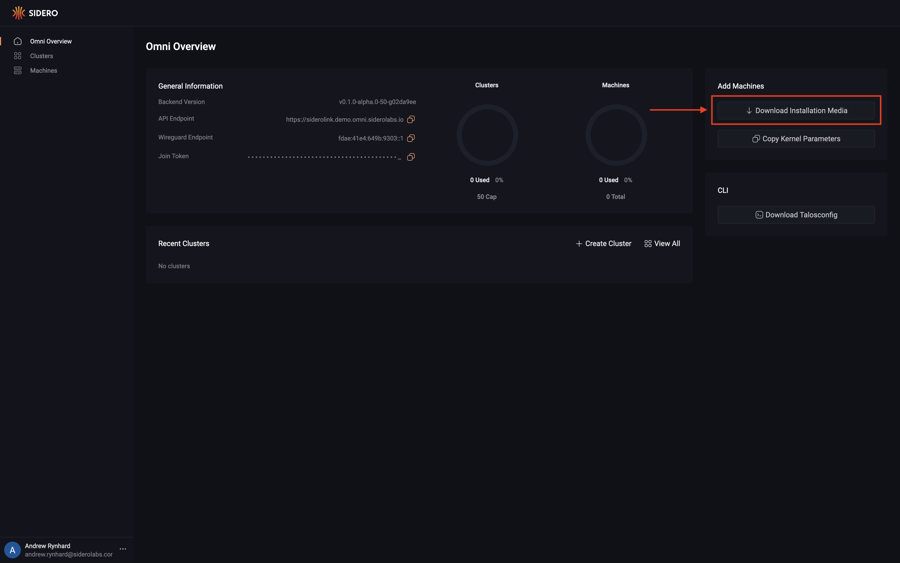
Upon logging in you will be presented with the Omni dashboard.
Download the Image
First, download the GCP image from the Omni portal by clicking on the “Download Installation Media” button.
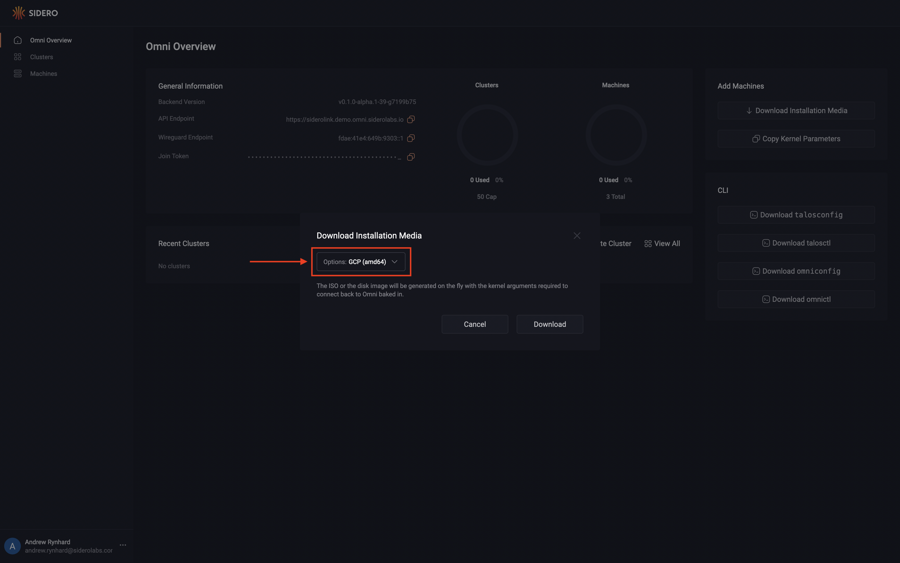
Now, click on the “Options” dropdown menu and search for the “GCP” option.
Notice there are two options: one for amd64 and another for arm64.
Select the appropriate option for the machine you are registering.
Now that you have selected the GCP option for the appropriate architecture, click the “Download” button.
Upload the Image
In the Google Cloud console, navigate to Buckets under the Cloud Storage menu, and create a new bucket with the default.
Click on the bucket in the Google Cloud console, click Upload Files, and select the image download from the Omni console.
Convert the Image
In the Google Cloud console select Images under the Compute Engine menu, and then Create Image.
Name your image (e.g. Omni-talos-1.2.6), then select the Source as Cloud Storage File.
Click Browse in the Cloud Storage File field and navigate to the bucket you created.
Select the image you uploaded.
Leave the rest of the options at their default and click Create at the bottom.
Create a GCP Instance
In Google Cloud console select VM instances under the Compute Engine menu.
Now select Create Instance.
Name your instance, and select a region and zone.
Under “Machine Configuration”, ensure your instance has at least 4GB of memory.
In the Boot Disk section, select Change and then select Custom Images.
Select the image created in the previous steps.
Now, click Create at the bottom to create your instance.
Conclusion
Navigate to the “Machines” menu in the sidebar. You should now see a machine listed.
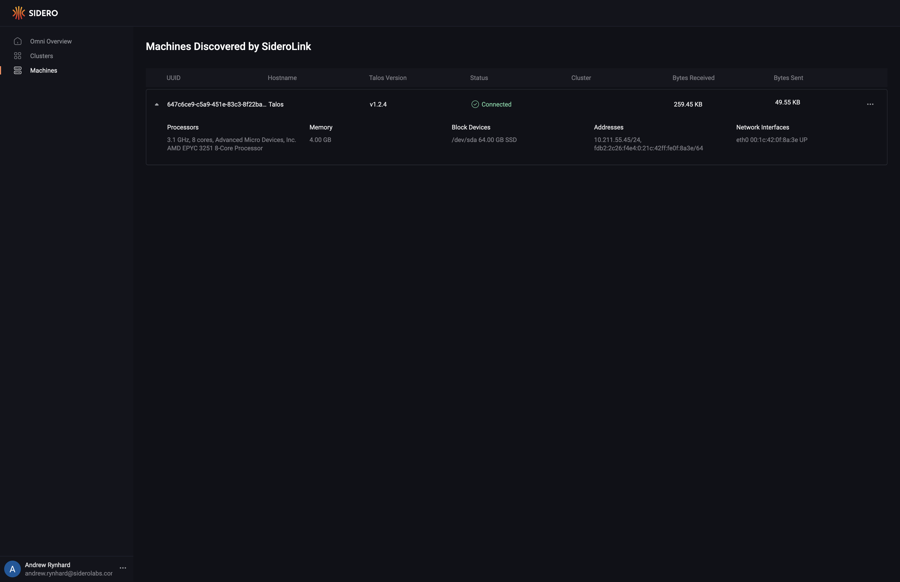
You now have a GCP machine registered with Omni and ready to provision.
4 - How to Register an AWS EC2 Instance
This guide shows you how to register an AWS EC2 instance with Omni.
Set your AWS region
REGION="us-west-2"
Creating the subnet
First, we need to know what VPC to create the subnet on, so let’s describe the VPCs in the region where we want to create the Omni machines.
$ aws ec2 describe-vpcs --region $REGION
{
    "Vpcs": [
        {
            "CidrBlock": "172.31.0.0/16",
            "DhcpOptionsId": "dopt-0238fea7541672af0",
            "State": "available",
            "VpcId": "vpc-04ea926270c55d724",
            "OwnerId": "753518523373",
            "InstanceTenancy": "default",
            "CidrBlockAssociationSet": [
                {
                    "AssociationId": "vpc-cidr-assoc-0e518f7ac9d02907d",
                    "CidrBlock": "172.31.0.0/16",
                    "CidrBlockState": {
                        "State": "associated"
                    }
                }
            ],
            "IsDefault": true
        }
    ]
}
Note the VpcId (vpc-04ea926270c55d724).
Now, create a subnet on that VPC with a CIDR block that is within the CIDR block of the VPC. In the above example, as the VPC has a CIDR block of 172.31.0.0/16, we can use 172.31.128.0/20.
$ aws ec2 create-subnet \
    --vpc-id vpc-04ea926270c55d724 \
    --region us-west-2 \
    --cidr-block 172.31.128.0/20
{
    "Subnet": {
        "AvailabilityZone": "us-west-2c",
        "AvailabilityZoneId": "usw2-az3",
        "AvailableIpAddressCount": 4091,
        "CidrBlock": "172.31.192.0/20",
        "DefaultForAz": false,
        "MapPublicIpOnLaunch": false,
        "State": "available",
        "SubnetId": "subnet-04f4d6708a2c2fb0d",
        "VpcId": "vpc-04ea926270c55d724",
        "OwnerId": "753518523373",
        "AssignIpv6AddressOnCreation": false,
        "Ipv6CidrBlockAssociationSet": [],
        "SubnetArn": "arn:aws:ec2:us-west-2:753518523373:subnet/subnet-04f4d6708a2c2fb0d",
        "EnableDns64": false,
        "Ipv6Native": false,
        "PrivateDnsNameOptionsOnLaunch": {
            "HostnameType": "ip-name",
            "EnableResourceNameDnsARecord": false,
            "EnableResourceNameDnsAAAARecord": false
        }
    }
}
Note the SubnetID (subnet-04f4d6708a2c2fb0d).
Create the Security Group
$ aws ec2 create-security-group \
    --region $REGION \
    --group-name omni-aws-sg \
    --description "Security Group for Omni EC2 instances"
{
    "GroupId": "sg-0b2073b72a3ca4b03"
}
Note the GroupId (sg-0b2073b72a3ca4b03).
Allow all internal traffic within the same security group, so that Kubernetes applications can talk to each other on different machines:
aws ec2 authorize-security-group-ingress \
    --region $REGION \
    --group-name omni-aws-sg \
    --protocol all \
    --port 0 \
    --source-group omni-aws-sg
Creating the bootable AMI
To do so, log in to your Omni account, and, from the Omni overview page, select “Download Installation Media”. Select “AWS AMI (amd64)” or “AWS AMI (arm64)”, as appropriate for your desired EC2 instances. (Most are amd64.) Click “Download”, and the AMI will be downloaded to you local machine.
Extract the downloaded aws-amd64.tar.gz
Then copy the disk.raw file to S3.
We need to create a bucket, copy the image file to it, import it as a snapshot, then register an AMI image from it.
Create S3 bucket
REGION="us-west-2"
aws s3api create-bucket \
    --bucket <bucket name> \
    --create-bucket-configuration LocationConstraint=$REGION \
    --acl private
Copy image file to the bucket
aws s3 cp disk.raw s3://<bucket name>/omni-aws.raw
Import the image as a snapshot
$ aws ec2 import-snapshot \
    --region $REGION \
    --description "Omni AWS" \
    --disk-container "Format=raw,UserBucket={S3Bucket=<bucket name>,S3Key=omni-aws.raw}"
{
    "Description": "Omni AWS",
    "ImportTaskId": "import-snap-1234567890abcdef0",
    "SnapshotTaskDetail": {
        "Description": "Omni AWS",
        "DiskImageSize": "0.0",
        "Format": "RAW",
        "Progress": "3",
        "Status": "active",
        "StatusMessage": "pending"
        "UserBucket": {
            "S3Bucket": "<bucket name>",
            "S3Key": "omni-aws.raw"
        }
    }
}
Check the status of the import with:
$ aws ec2 describe-import-snapshot-tasks \
    --region $REGION \
    --import-task-ids
{
    "ImportSnapshotTasks": [
        {
            "Description": "Omni AWS",
            "ImportTaskId": "import-snap-1234567890abcdef0",
            "SnapshotTaskDetail": {
                "Description": "Omni AWS",
                "DiskImageSize": "705638400.0",
                "Format": "RAW",
                "Progress": "42",
                "Status": "active",
                "StatusMessage": "downloading/converting",
                "UserBucket": {
                    "S3Bucket": "<bucket name>",
                    "S3Key": "omni-aws.raw"
                }
            }
        }
    ]
}
Once the Status is completed note the SnapshotId (snap-0298efd6f5c8d5cff).
Register the Image
$ aws ec2 register-image \
    --region $REGION \
    --block-device-mappings "DeviceName=/dev/xvda,VirtualName=talos,Ebs={DeleteOnTermination=true,SnapshotId=$SNAPSHOT,VolumeSize=4,VolumeType=gp2}" \
    --root-device-name /dev/xvda \
    --virtualization-type hvm \
    --architecture x86_64 \
    --ena-support \
    --name omni-aws-ami
{
    "ImageId": "ami-07961b424e87e827f"
}
Note the ImageId (ami-07961b424e87e827f).
Create EC2 instances from the AMI
Now, using the AMI we created, along with the security group created above, provision EC2 instances:
 aws ec2 run-instances \
    --region  $REGION \
    --image-id ami-07961b424e87e827f \
    --count 1 \
    --instance-type t3.small   \
    --subnet-id subnet-0a7f5f87f62c301ea \
    --security-group-ids $SECURITY_GROUP   \
    --associate-public-ip-address \
    --tag-specifications "ResourceType=instance,Tags=[{Key=Name,Value=omni-aws-ami}]" \
    --instance-market-options '{"MarketType":"spot"}'
5 - How to Register an Azure Instance
This guide shows you how to register an Azure instance with Omni.
Dashboard
Upon logging in you will be presented with the Omni dashboard.

Download the Image
Download the Azure image from the Omni portal by clicking on the “Download Installation Media” button.
Click on the “Options” dropdown menu and search for the “Azure” option.
Notice there are two options: one for amd64 and another for arm64.
Select the appropriate architecture for the machine you are registering, then click the “Download” button.
Once downloaded to your local machine, untar with tar -xvf /path/to/image
Upload the Image
In the Azure console, navigate to Storage accounts, and create a new storage account.
Once the account is provisioned, navigate to the resource and click Upload. In the Upload Blob form, select Create New container, and name your container (e.g. omni-may-2023).
Now click Browse for Files, and select the disk.vhd file that you uncompressed above, then select Upload.
We’ll make use of the following environment variables throughout the setup. Edit the variables below with your correct information.
# Storage account to use
export STORAGE_ACCOUNT="StorageAccountName"

# Storage container to upload to
export STORAGE_CONTAINER="StorageContainerName"

# Resource group name
export GROUP="ResourceGroupName"

# Location
export LOCATION="centralus"

# Get storage account connection string based on info above
export CONNECTION=$(az storage account show-connection-string \
                    -n $STORAGE_ACCOUNT \
                    -g $GROUP \
                    -o tsv)
You can upload the image you uncompressed to blob storage with:
az storage blob upload \
  --connection-string $CONNECTION \
  --container-name $STORAGE_CONTAINER \
  -f /path/to/extracted/disk.vhd \
  -n omni-azure.vhd
Convert the Image
In the Azure console select Images, and then Create.
Select a Resource Group, Name your image (e.g. omni-may), and set the OS type to Linux.
Now Browse to the storage blob created above, navigating to the container with the uploaded disk.vhd.
Select “Standard HDD” for account type, then click Review and Create, then Create.
Now that the image is present in our blob storage, we’ll register it.
az image create \
  --name omni \
  --source https://$STORAGE_ACCOUNT.blob.core.windows.net/$STORAGE_CONTAINER/omni-azure.vhd \
  --os-type linux \
  -g $GROUP
Create an Azure Instance
Creating an instance requires setting the os-disk-size property, which is easiest to achieve via the CLI:
az vm create \
    --name azure-worker \
    --image omni \
    -g $GROUP \
    --admin-username talos \
    --generate-ssh-keys \
    --verbose \
    --os-disk-size-gb 20
Conclusion
In the Omni UI, navigate to the “Machines” menu in the sidebar. You should now see the Azure machine that was created listed as an available machine, registered with Omni and ready to provision.
6 - How to Create a Service Account Kubeconfig
This guide shows you how to create a service account kubeconfig in Omni.
You need omnictl installed and configured to follow this guide.
If you haven’t done so already, follow the omnictl guide.
You also need to have a cluster created in Omni to follow this guide.
Creating the Service Account Kubeconfig
To create a service account kubeconfig, run the following command:
omnictl kubeconfig --service-account -c <cluster> --user <user> <path to kubeconfig>
Note
Replace<path to kubeconfig> with a path where the kubeconfig file should be written.
Replace <cluster> with the name of the cluster in Omni.
Replace <user> with any value you would like.
This command will create a service account token with the given username and obtain a kubeconfig file for the given cluster and username.
You can now use kubectl with the generated kubeconfig.
7 - How to Scale Down a Cluster
This guide shows you how to delete machines in a cluster with Omni.
Upon logging in, click the “Clusters” menu item on the left, then the name of the cluster you wish to delete nodes from. Click the “Nodes” menu item on the left. Now, select “Destroy” from the menu under the elipsis:
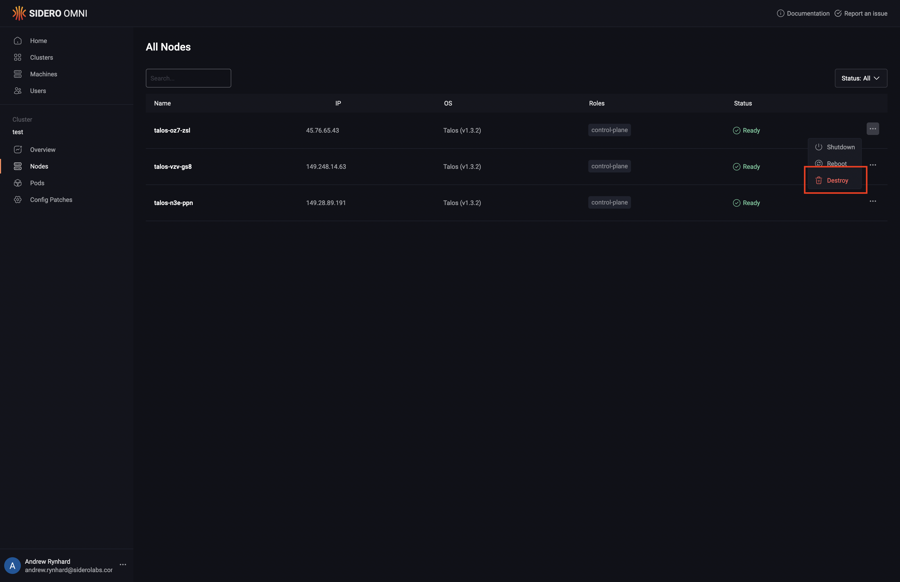
The cluster will now scale down.
8 - How to Scale Up a Cluster
This guide shows you how to add machines to a cluster with Omni. Upon logging in, click the “Cluster” menu item on the left, then the name of the cluster you wish to add nodes to. From the “Cluster Overview” tab, click the “Add Machines” button in the sidebar on the right.

From the list of available machines that is shown, identify the machine or machines you wish to add, and then click “ControlPlane” or “Worker”, to add the machine with that role. You may add multiple machines in one operation. Click “Add Machines” when all machines have been selected to be added.
The cluster will now scale up.
9 - How to Register a Hetzner Server
This guide shows you how to register a Hetzner server with Omni.
Dashboard
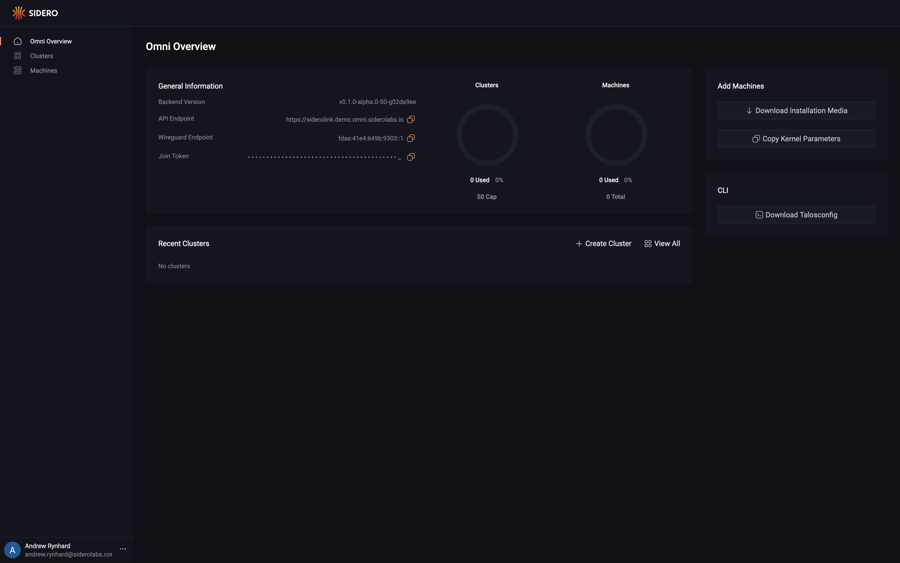
Upon logging in you will be presented with the Omni dashboard.
Download the Hetzner Image
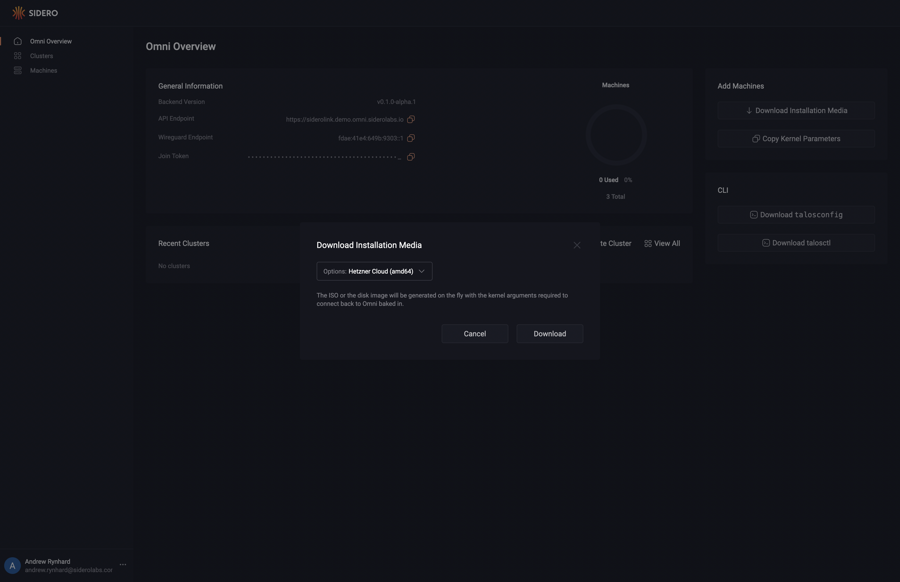
First, download the Hetzner image from the Omni portal by clicking on the “Download Installation Media” button.
Now, click on the “Options” dropdown menu and search for the “Hetzner” option.
Notice there are two options: one for amd64 and another for arm64.
Select the appropriate option for the machine you are registering.
Now, click the “Download” button.
Place the following in the same directory as the downloaded installation media and name the file hcloud.pkr.hcl:
packer {
  required_plugins {
    hcloud = {
      version = ">= 1.0.0"
      source  = "github.com/hashicorp/hcloud"
    }
  }
}

locals {
  image = "<path to downloaded installation media>"
}

source "hcloud" "talos" {
  rescue       = "linux64"
  image        = "debian-11"
  location     = "hel1"
  server_type  = "cx11"
  ssh_username = "root"

  snapshot_name = "Omni Image"
}

build {
  sources = ["source.hcloud.talos"]

  provisioner "file" {
    source = "${local.image}"
    destination = "/tmp/talos.raw.xz"
  }

  provisioner "shell" {
    inline = [
      "xz -d -c /tmp/talos.raw.xz | dd of=/dev/sda && sync",
    ]
  }
}
Now, run the following:
export HCLOUD_TOKEN=${TOKEN}
packer init .
packer build .
Take note of the image ID produced by by running this command.
Create a Server
hcloud context create talos

hcloud server create --name omni-talos-1 \
    --image <image ID> \
    --type cx21 --location <location>
Warning
Machines must be able to egress to your account’s WireGuard port and port 443.Conclusion
Navigate to the “Machines” menu in the sidebar. You should now see a machine listed.
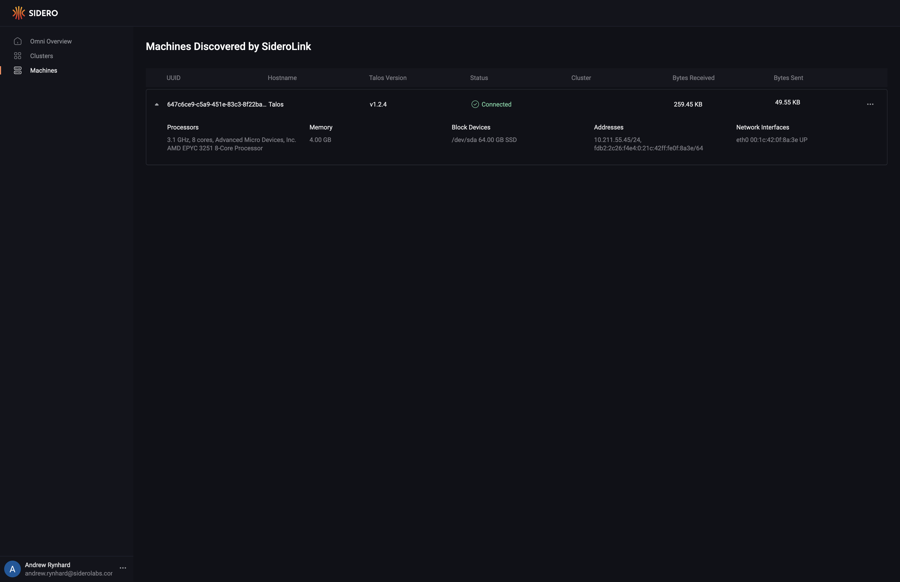
You now have a Hetzner server registered with Omni and ready to provision.
10 - How to File an Issue
This guide shows you file an issue for Omni.
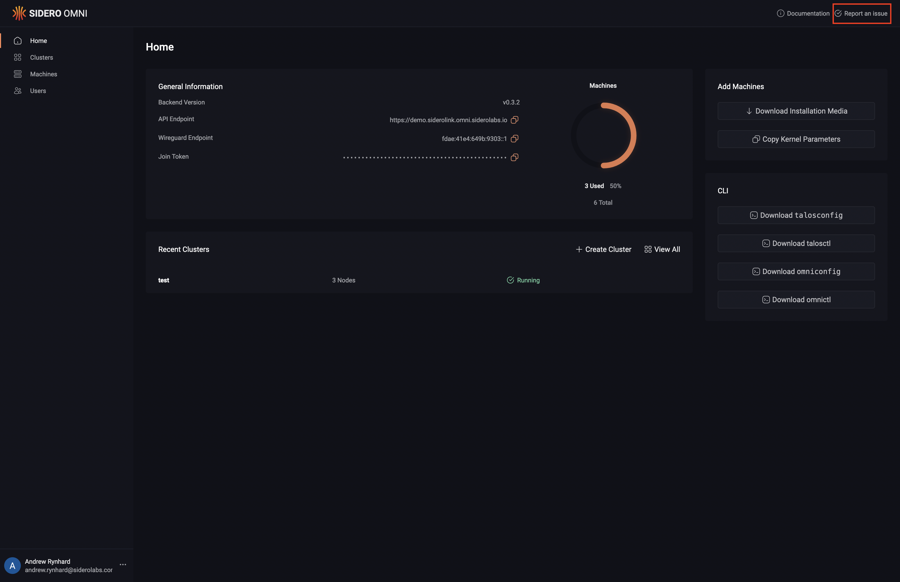
Click on the “Report an issue” button in the header:
Now, click on the “New issue” button:
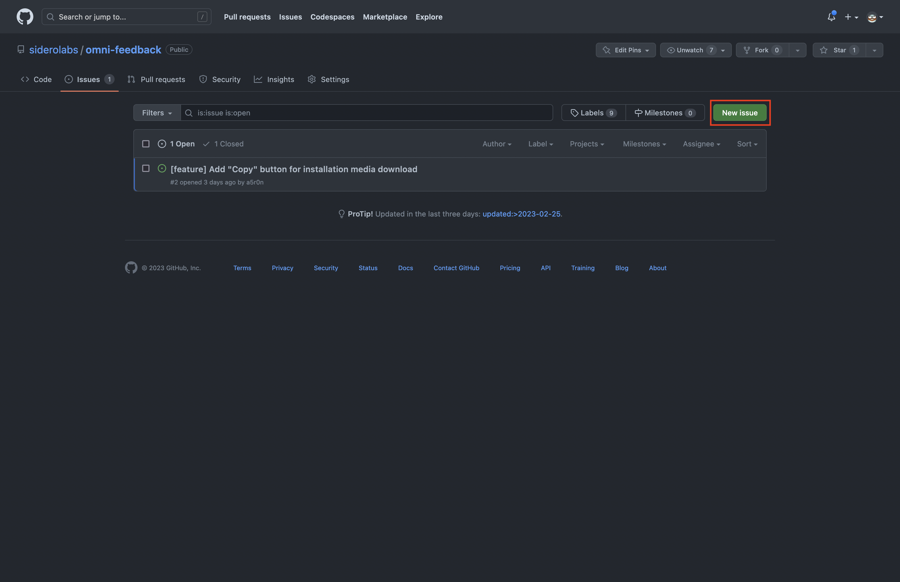
Choose the issue type, fill in the details, and submit the issue.
11 - How to install talosctl
This guide shows you how to install talosctl.
Run the following:
curl -sL https://talos.dev/install | sh
You now have talosctl installed.
12 - How to Create a Cluster
This guide shows you how to create and a cluster from registered machines.
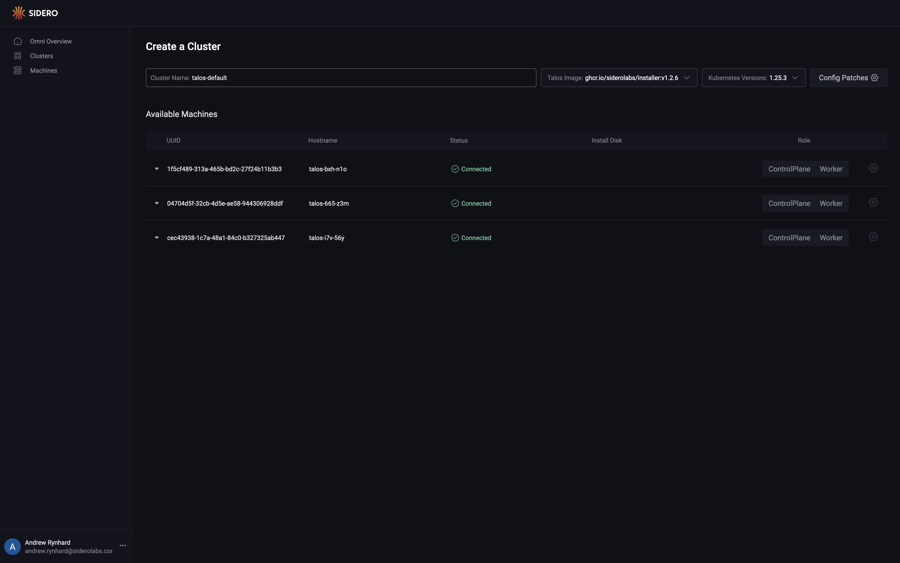
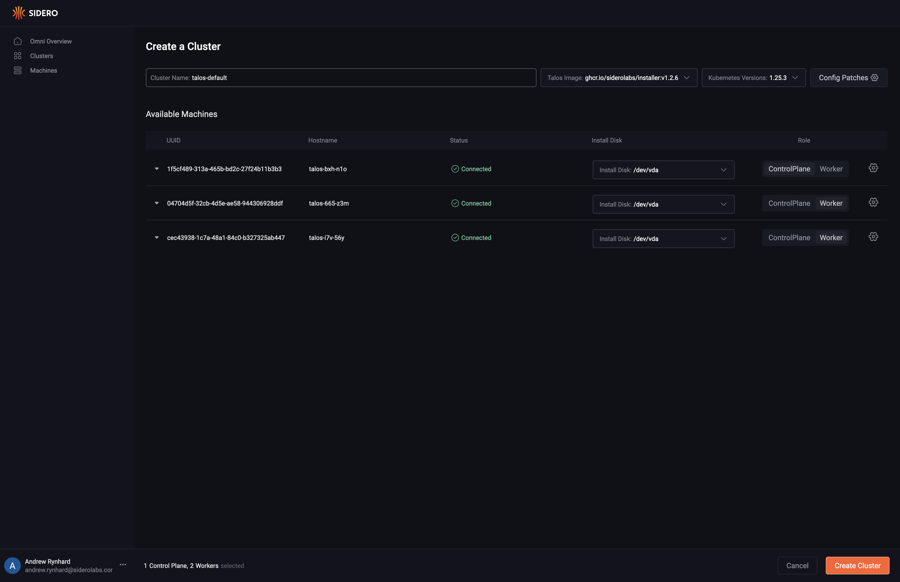
First, click the “Clusters” section button in the sidebar. Next, click the “Create Cluster” button.
<figcaption class="card-body px-0 pt-2 pb-0">
	<p class="card-text">
Select the role for each machine you would like to create a cluster from. Now that each machine has a role, choose the install disk from the dropdown menu for each machine. Finally, click “Create Cluster”
<figcaption class="card-body px-0 pt-2 pb-0">
	<p class="card-text">
Create a file called cluster.yaml with the following content:
kind: Cluster
name: example
kubernetes:
  version: v1.26.0
talos:
  version: v1.3.2
---
kind: ControlPlane
machines:
  - <control plane machine UUID>
---
kind: Workers
machines:
  - <worker machine UUID>
---
kind: Machine
name: <control plane machine UUID>
install:
  disk: /dev/<disk>
---
kind: Machine
name: <worker machine UUID>
install:
  disk: /dev/<disk>
Note
Be sure to update the UUIDs and install disks with the UUIDs and disks of the machines in your account.
Now, validate the document:
omnictl cluster template validate -f cluster.yaml
Create the cluster:
omnictl cluster template sync -f cluster.yaml --verbose
Finally, wait for the cluster to be up:
omnictl cluster template status -f cluster.yaml
13 - How to Create a Patch For Cluster Control Planes
This guide shows you how to create a patch for the control plane machine set of a cluster.
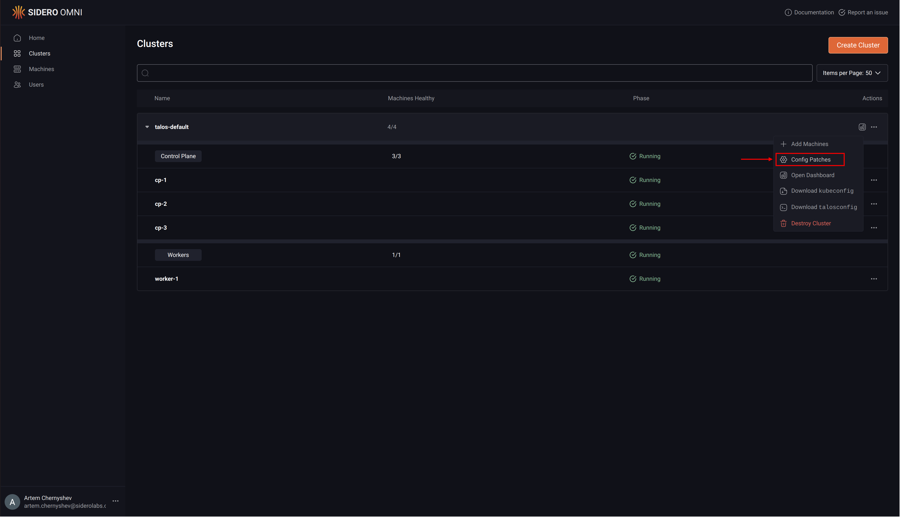
Upon logging in, click the “Clusters” menu item on the left. Now, select “Config Patches” from the menu under the elipsis:
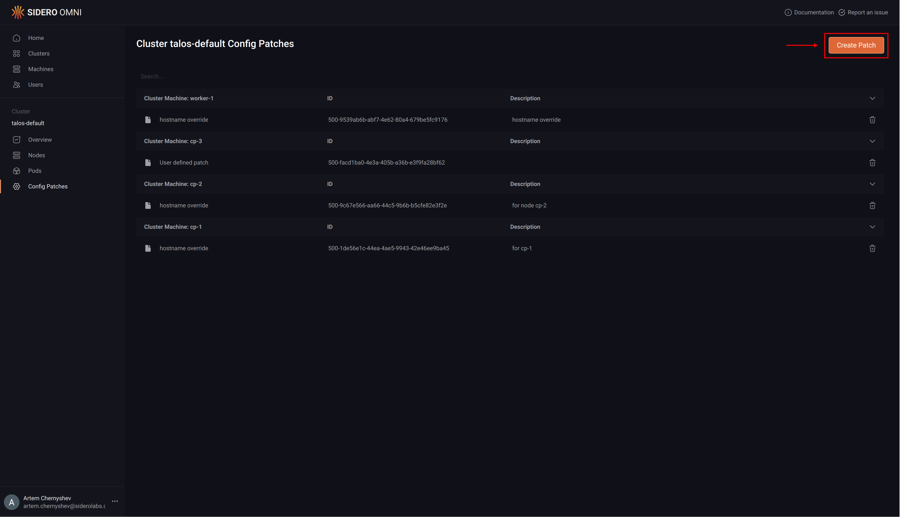
Next, click “Create Patch”:
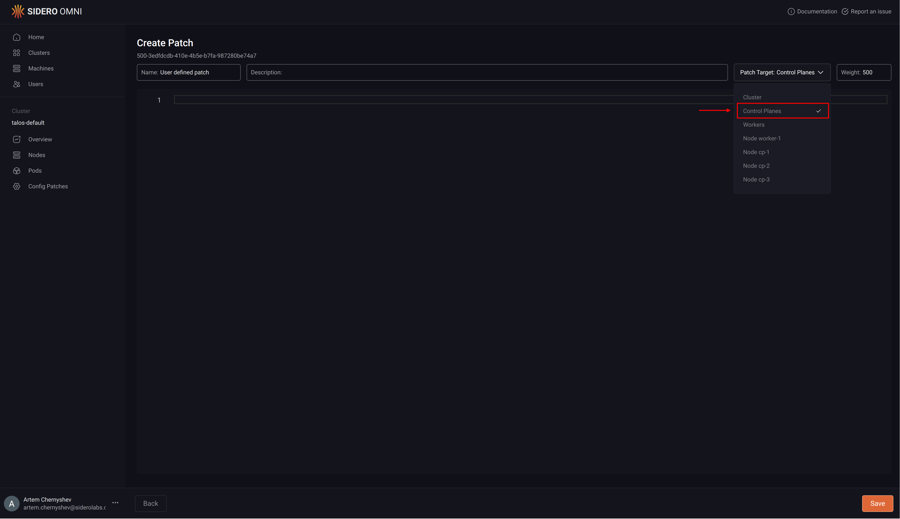
Pick the “Control Planes” option from the “Patch Target” dropdown:
Type in the desired config patch:
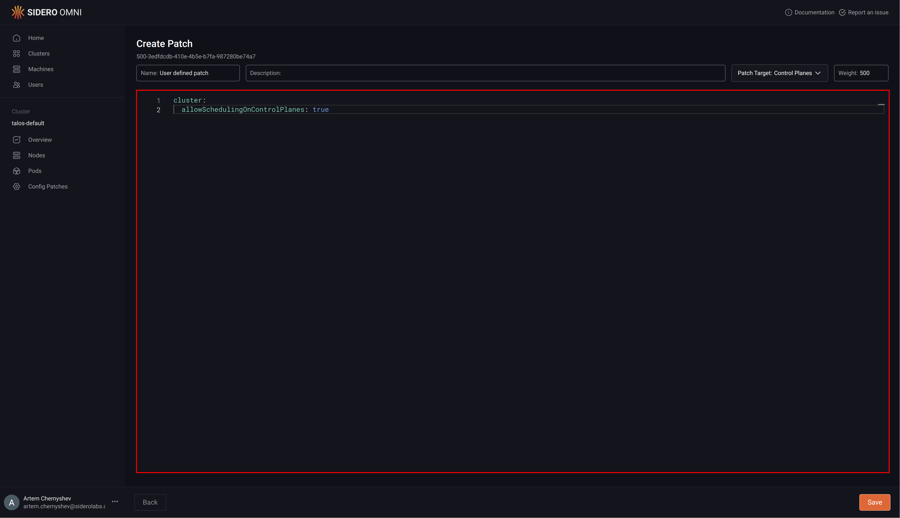
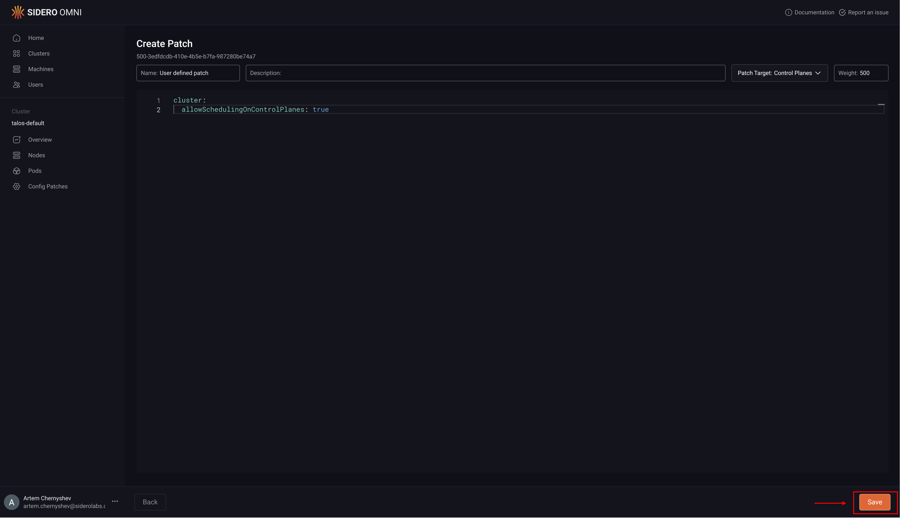
Click “Save” to create the config patch:
14 - How to Create a Patch For Cluster Machines
This guide shows you how to create a patch for a machine in a cluster.
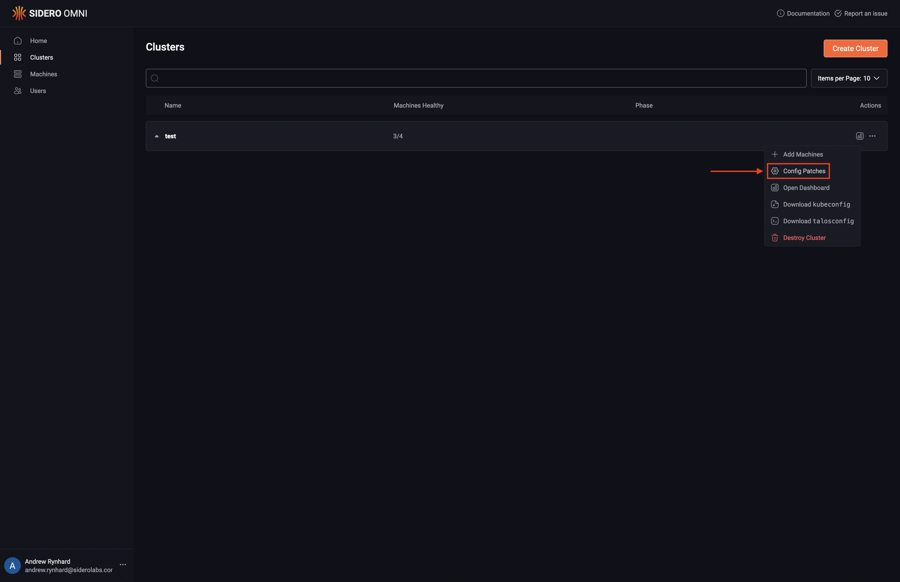
Upon logging in, click the “Clusters” menu item on the left. Now, select “Config Patches” from the menu under the elipsis:
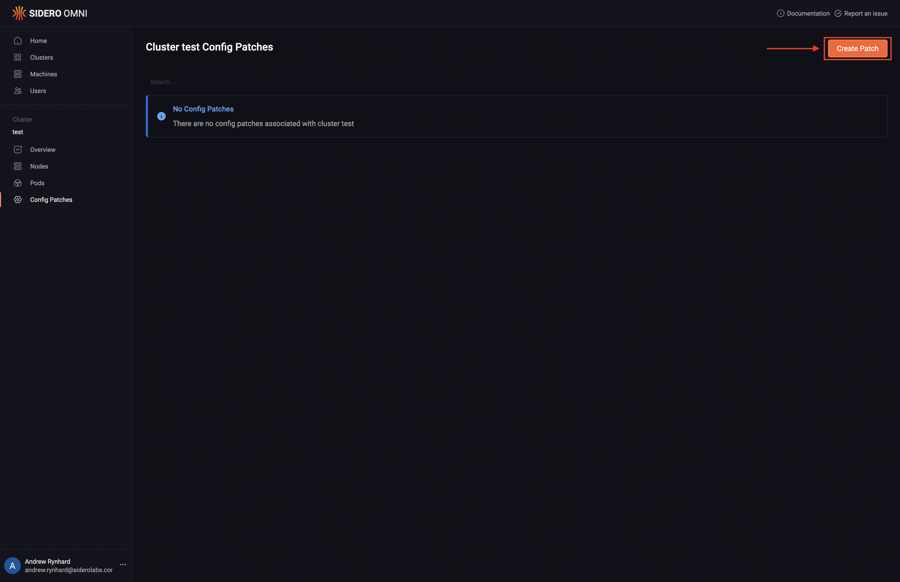
Next, click “Create Patch”:
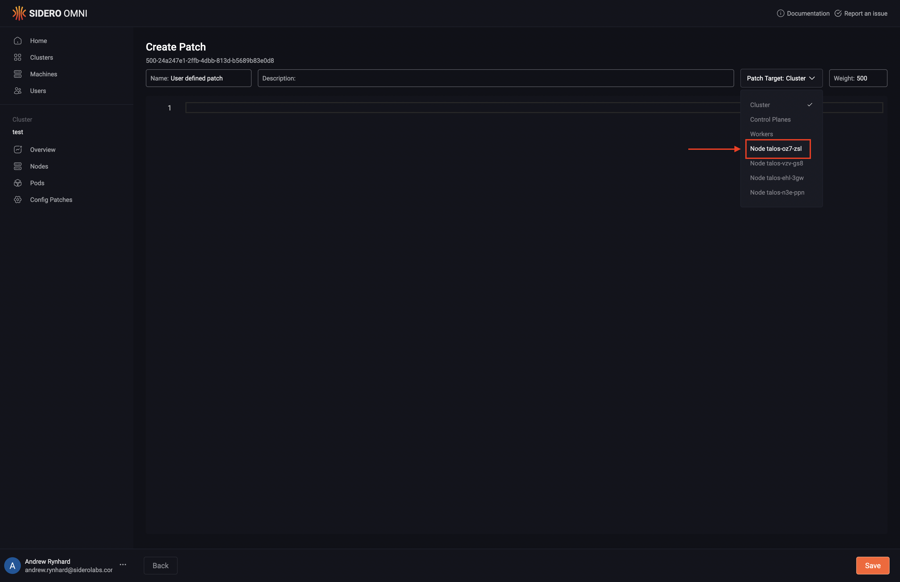
Pick the specific machine from the “Patch Target” dropdown:
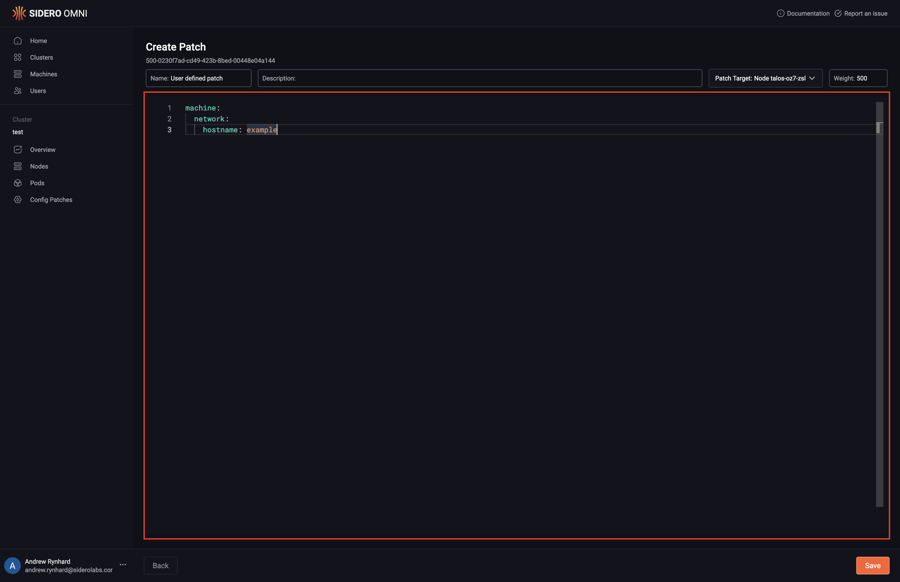
Type in the desired config patch:
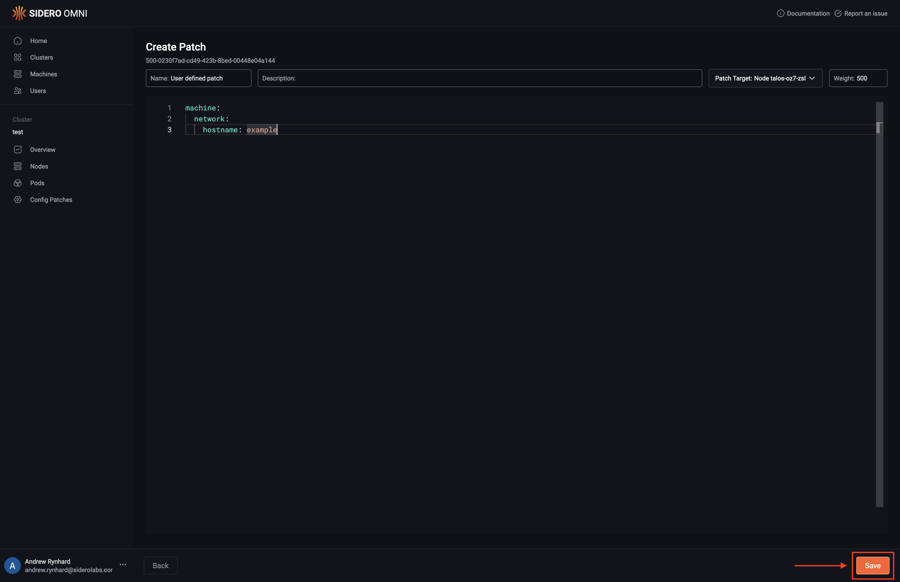
Click “Save” to create the config patch:
15 - How to Create a Patch For Cluster Workers
This guide shows you how to create a patch for the worker machine set of a cluster.
Upon logging in, click the “Clusters” menu item on the left. Now, select “Config Patches” from the menu under the elipsis:

Next, click “Create Patch”:

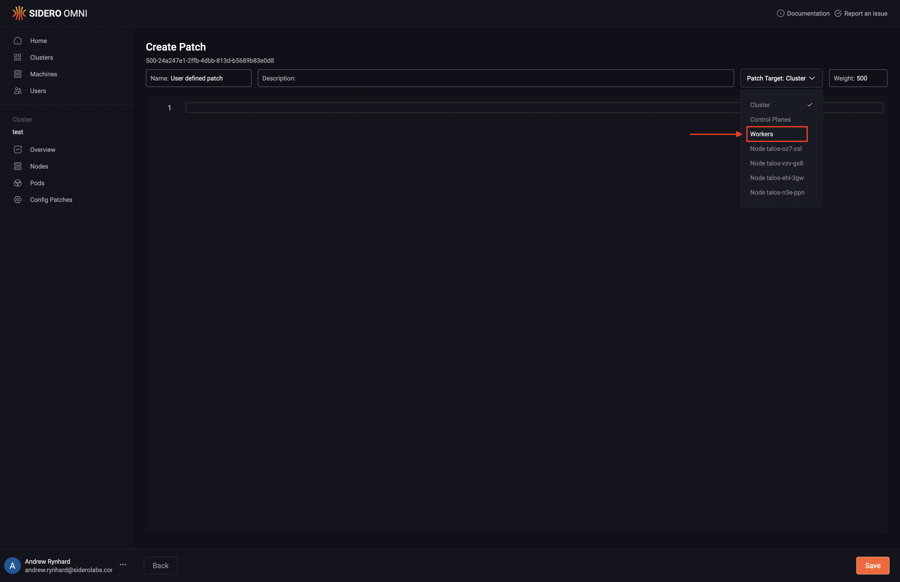
Pick the “Workers” option from the “Patch Target” dropdown:
Type in the desired config patch:
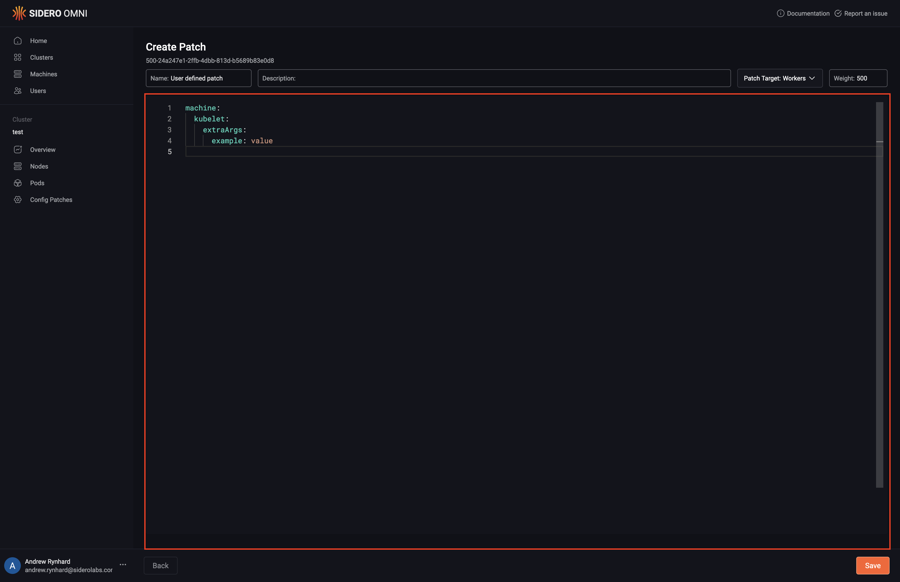
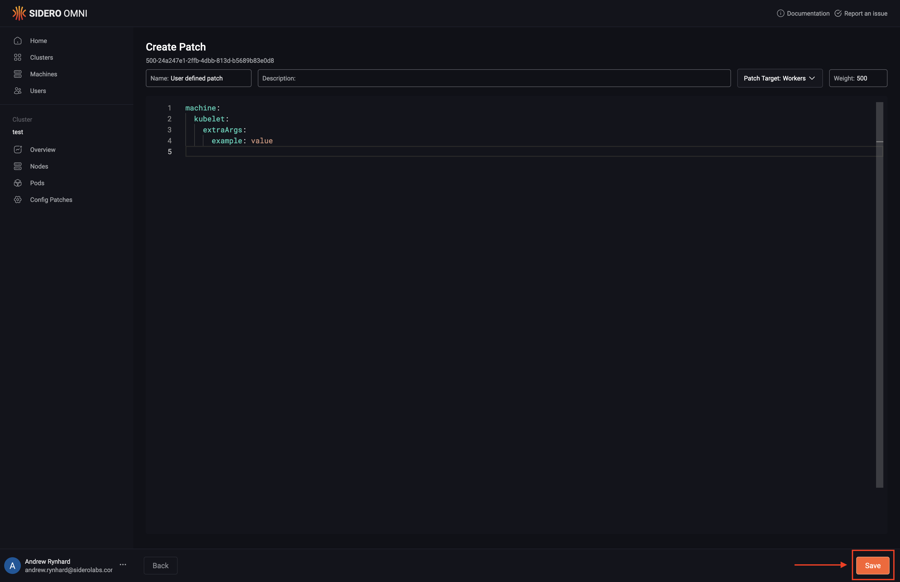
Click “Save” to create the config patch:
16 - How to Create a Hybrid Cluster
This guide shows you how to create and configure a cluster consisting of machines that are any combination of bare metal, cloud virtual machines, on-premise virtual machines, or SBCs, using KubeSpan, which enables Kubernetes to communicate securely with machines in the cluster on different networks.
Refer to the general guide on creating a cluster to get started. To create a hybid cluster apply the following cluster patch by clicking on “Config Patches” and navigating the the “Cluster” tab:
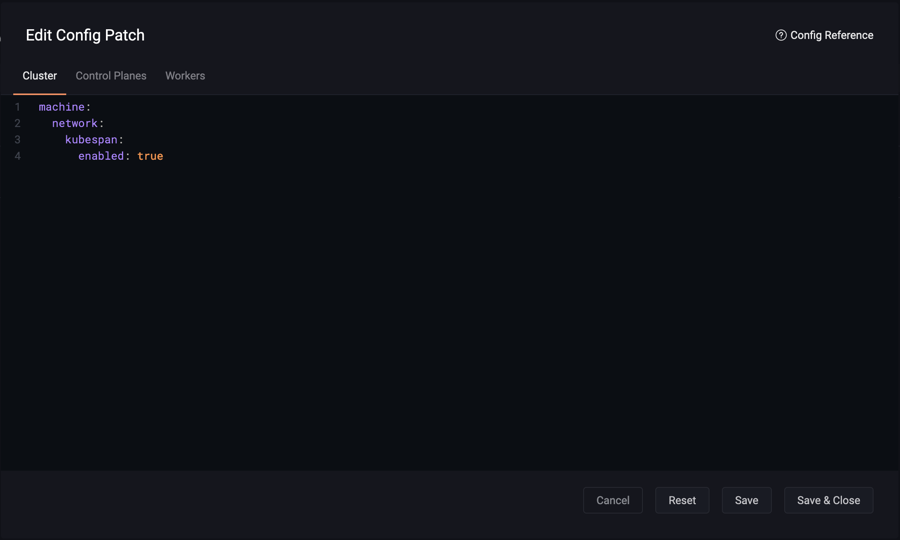
machine:
  network:
    kubespan:
      enabled: true
17 - How to Use Kubectl With Omni
This guide shows you how to use kubectl with an Omni-managed cluster.
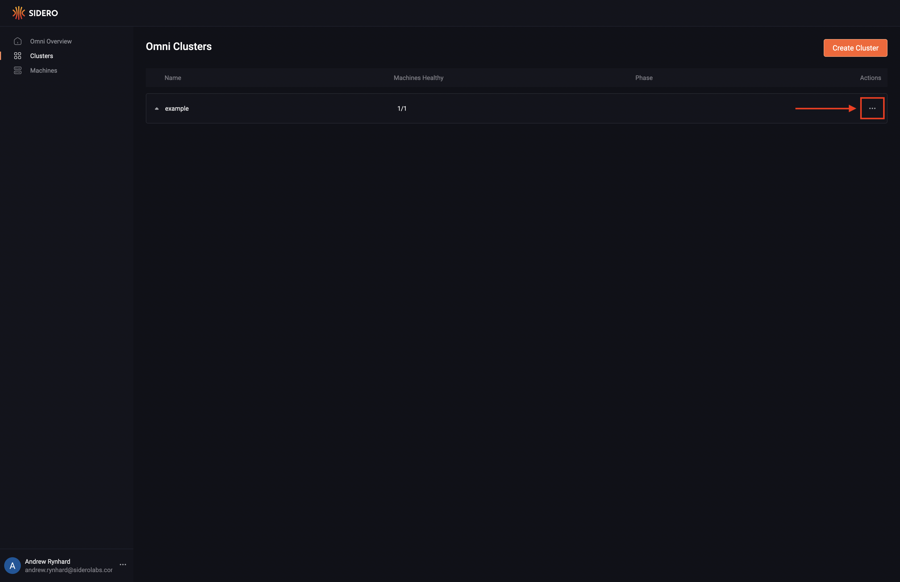
Navigate to the clusters page by clicking on the “Clusters” button in the sidebar.
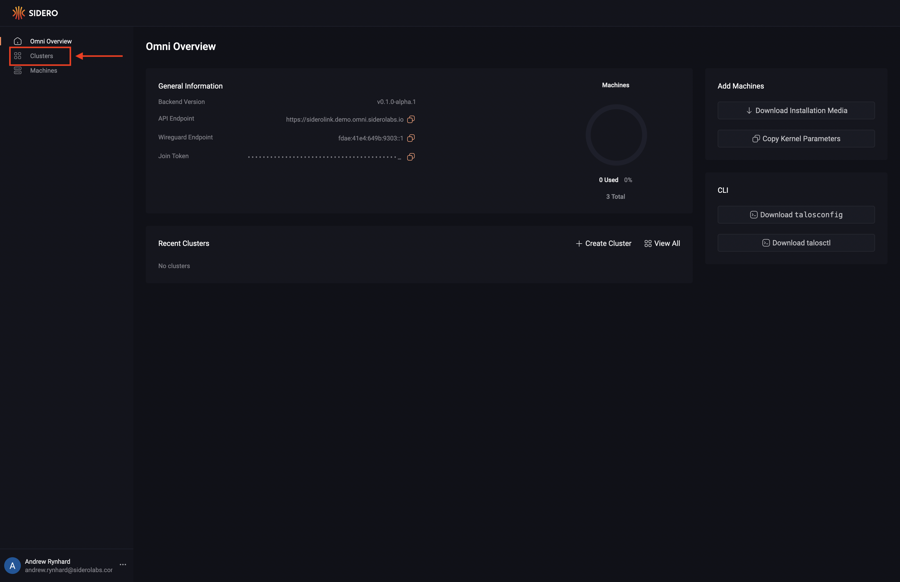
Click the three dots in the cluster’s item to access the options menu.
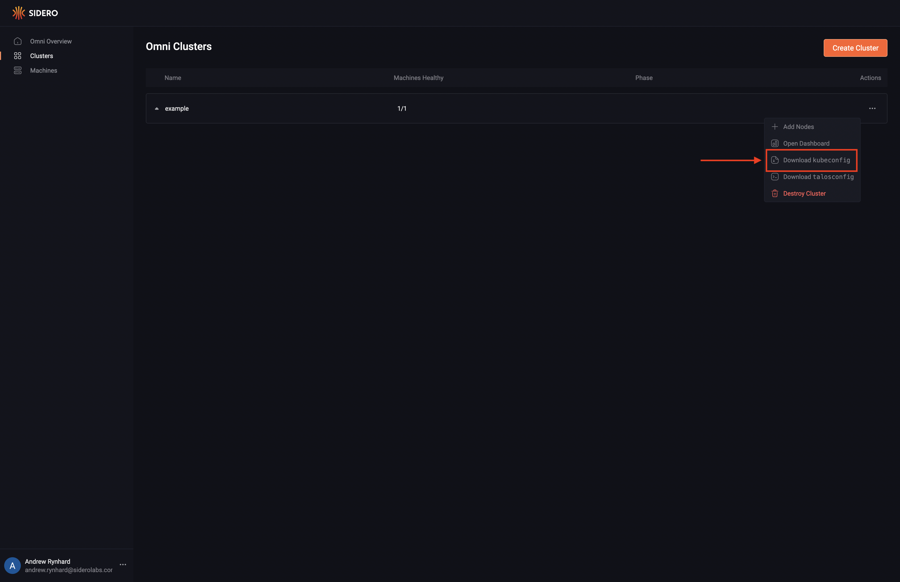
Click “Download kubeconfig”.
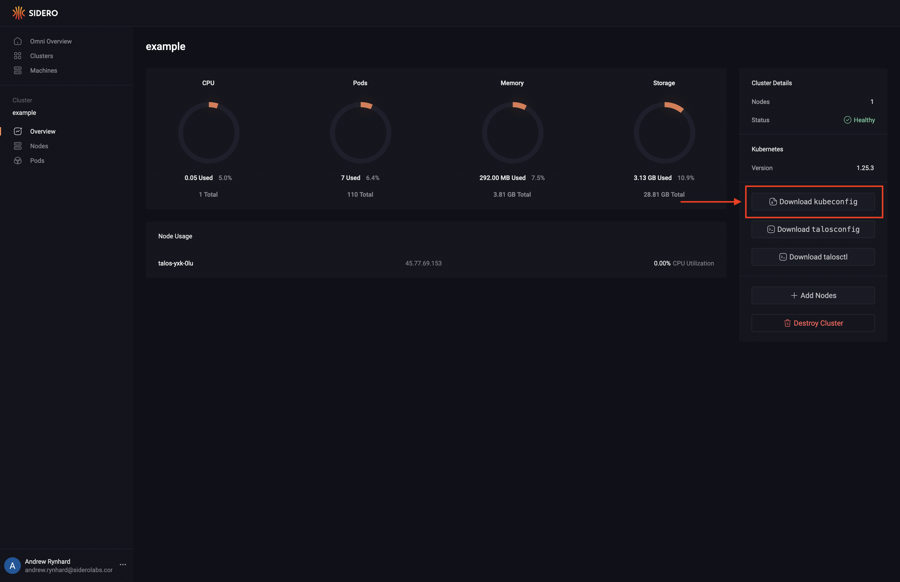
Alternatively you can click on the cluster and download the kubeconfig from the cluster dashboard.
Install the oidc-login plugin per the official documentation: https://github.com/int128/kubelogin.
18 - How to Install and Configure Omnictl
omnictl for Omni.This guide shows you how to install and configure omnictl.
Download omnictl and omniconfig from the Omni dashboard.
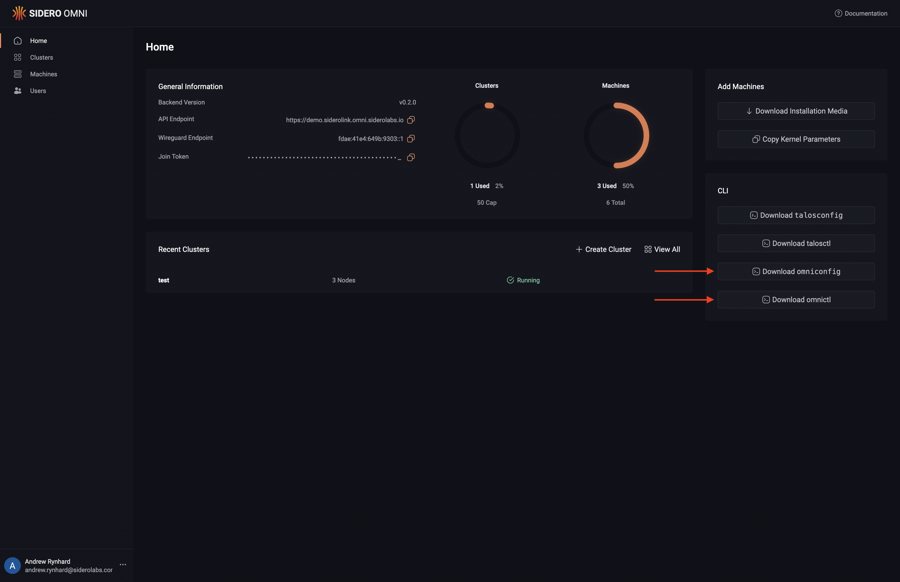
Note
The downloaded binary will be named according the the selected platform and architecture (e.g.omnictl-linux-amd64).
It is left as an exercise to the user to move the downloaded binary into your PATH and make it executable.
This guide assumes the downloaded binary is named omnictl.
Add the downloaded omniconfig.yaml to the default location to use it with omnictl:
omnictl config merge ./omniconfig.yaml
List the contexts to verify that the omniconfig was added:
$ omnictl config contexts
CURRENT   NAME         URL
          ...
          example      https://example.omni.siderolabs.io/
          ...
Run omnictl for the first time to perform initial authentication using a web browser:
omnictl get clusters
If the browser window does not open automatically, it can be opened manually by copying and pasting the URL into a web browser:
BROWSER=echo omnictl get clusters
19 - How to Deploy Omni On-prem
This guide shows you how to deploy Omni on-prem.
First, you will need an Auth0 account. On the account level, configure “Authentication - Social” to allow GitHub and Google login. Create an Auth0 application of the type “single page web application”. Configure the Auth0 application with the following:
- Allowed callback URLs: https://localhost:8080/
- Allowed web origins: https://localhost:8080/
- Allowed logout URLs: https://localhost:8080/
Disable username/password auth on “Authentication - Database - Applications” tab. Enable GitHub and Google login on the “Authentication - Social” tab. Enable email access in the GitHub settings. Take note of the following information from the Auth0 application:
- Domain
- Client ID
Generate a GPG key:
gpg --quick-generate-key "Omni (Used for etcd data encryption) how-to-guide@siderolabs.com" rsa4096 cert never
Find the fingerprint of the generated key:
gpg --list-secret-keys
gpg --quick-add-key $FPR rsa4096 encr never
gpg --export-secret-key --armor how-to-guide@siderolabs.com > omni.asc
Generate a TLS certificate:
A valid TLS certificate is required by Omni. This is an excercise left up to the user.
Generate a UUID:
export OMNI_ACCOUNT_UUID=$(uuidgen)
Ensure that docker is installed on the same machine as omni.
Finally, run omni:
docker run \
  --net=host \
  --cap-add=NET_ADMIN \
  --sysctl net.ipv6.conf.all.disable_ipv6=0 \
  -v $PWD/etcd:_out/etcd \
  -v /var/run/docker.sock:/var/run/docker.sock \
  -v <path to TLS certificate>:/tls.crt \
  -v <path to TLS key>/tls.key:/tls.key \
  -v $PWD/omni.asc:/omni.asc \
  ghcr.io/siderolabs/omni:<tag> \
    --account-id=${OMNI_ACCOUNT_UUID} \
    --name=how-to-guide \
    --cert=/tls.crt \
    --key=/tls.key \
    --siderolink-api-cert=/tls.crt \
    --siderolink-api-key=/tls.key \
    --private-key-source=file:///omni.asc \
    --event-sink-port=8091 \
    --bind-addr=0.0.0.0:8080 \
    --siderolink-api-bind-addr=0.0.0.0:8090 \
    --k8s-proxy-bind-addr=0.0.0.0:8100 \
    --advertised-api-url=https://<ip address of the host running Omni>:8080/ \
    --siderolink-api-advertised-url=https://<ip address of the host running Omni>:8090/ \
    --siderolink-wireguard-advertised-addr=<ip address of the host running Omni>:50180 \
    --advertised-kubernetes-proxy-url=https://<ip address of the host running Omni>:8100/ \
    --auth-auth0-enabled=true \
    --auth-auth0-domain=<Auth0 domain> \
    --auth-auth0-client-id=<Auth0 client ID> \
    --initial-users=<email address>
Configuration options are available in the help menu (--help).
Note
Note that you can omit the--cert, --key, --siderolink-api-cert, and --siderolink-api-key flags to run Omni insecurely.
20 - How to Back Up On-prem Omni Database
This guide shows you how to back up the database of an on-prem Omni instance.
Omni uses etcd as its database.
There are 2 operating modes for etcd: embedded and external.
When Omni is run with --etcd-embedded=true flag, it will configure the embedded etcd server to
listen the addresses specified by the --etcd-endpoints flag (http://localhost:2379 by default).
In the same host where Omni is running (in Docker, --network=host needs to be used), you can use
the etcdctl command to back up the database:
etcdctl --endpoints http://localhost:2379 snapshot save snapshot.db
The command will save the snapshot of the database to the snapshot.db file.
It is recommended to periodically (e.g. with a cron job) take snapshots and store them in a safe location, like an S3 bucket.
Note
When --etcd-embedded is set to false, the database is external and not managed by Omni.
It still needs to be regularly backed up. For more info, see etcd disaster recovery.
21 - How to Configure Keycloak for Omni
-
Log in to Keycloak.
-
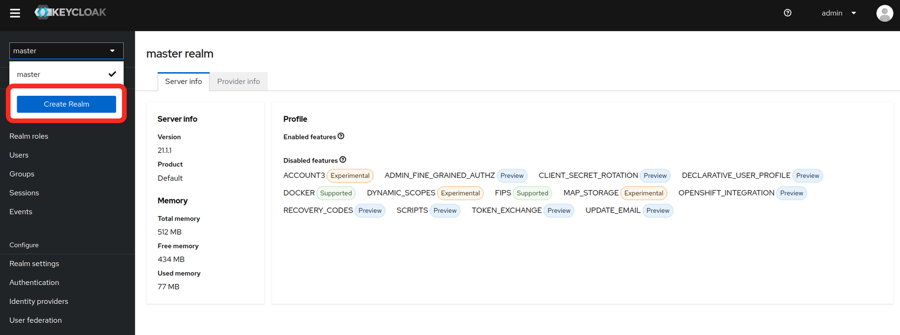
Create a realm.
- In the upper left corner of the page, select the dropdown where it says master
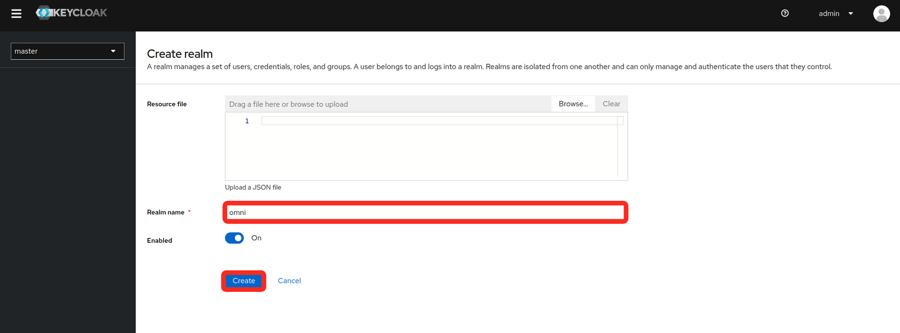
- Fill in the realm name and select create
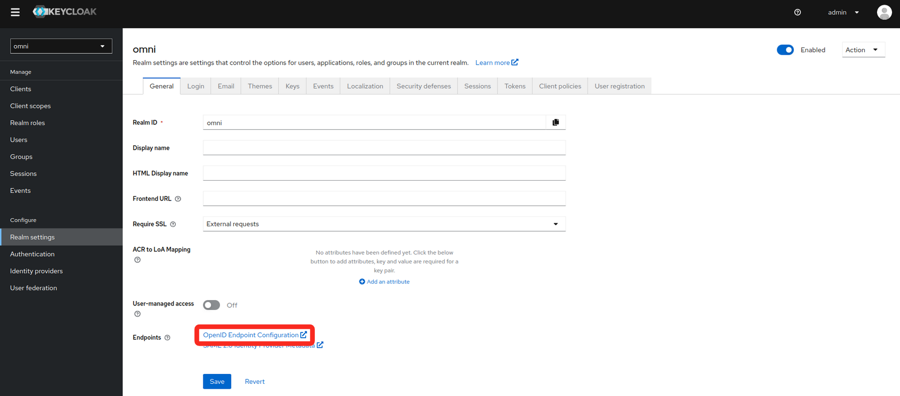
- Find the realm metadata.
- In the realm settings, there is a link to the metadata needed for SAML under Endpoints.
- Copy the link or save the data to a file. It will be needed for the installation of Omni.
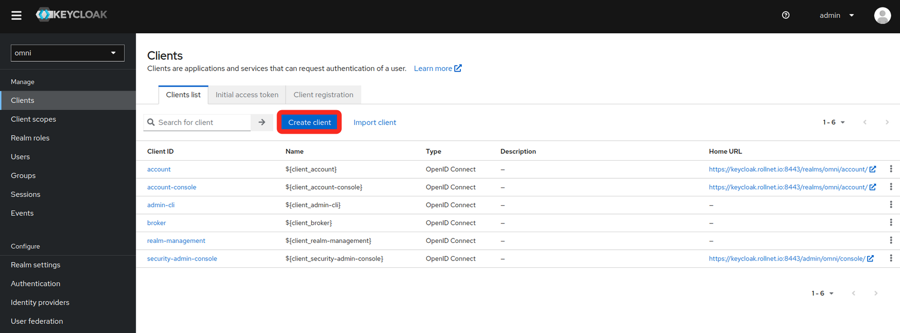
- Create a client
- Select the Clients tab on the left
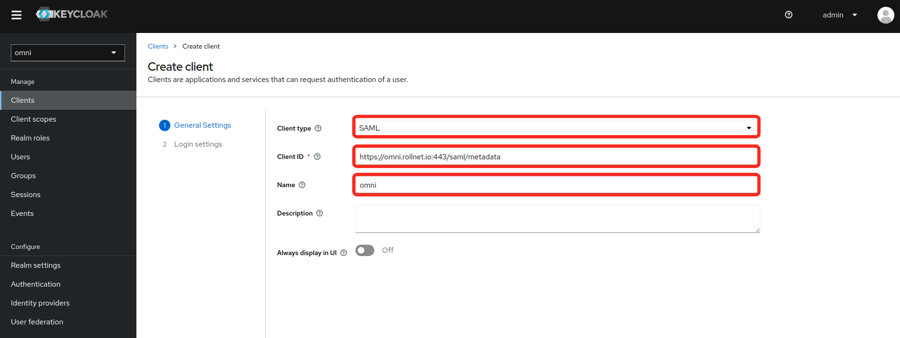
- Fill in the General Settings as shown in the example below. Replace the hostname in the example with your own Omni hostname or IP.
- Client type
- Client ID
- Name
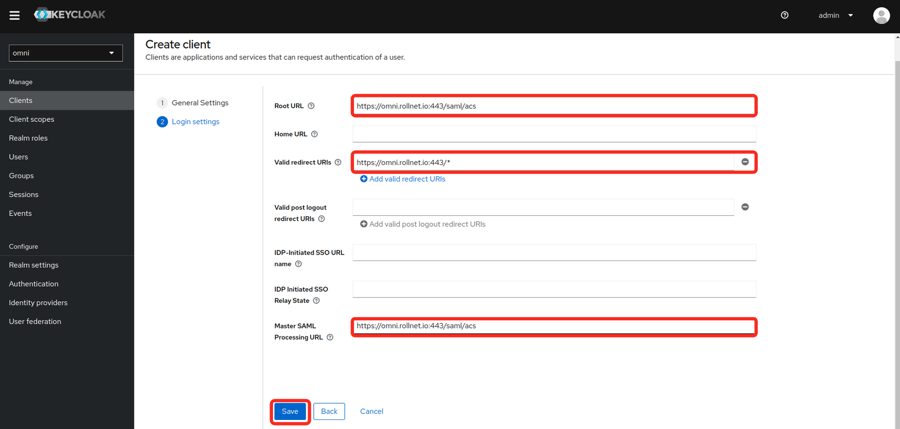
- Fill in the Login settings as shown in the example below. Replace the hostname in the example with your own Omni hostname or IP.
- Root URL
- Valid redirect URIs
- Master SAML PRocessing URL
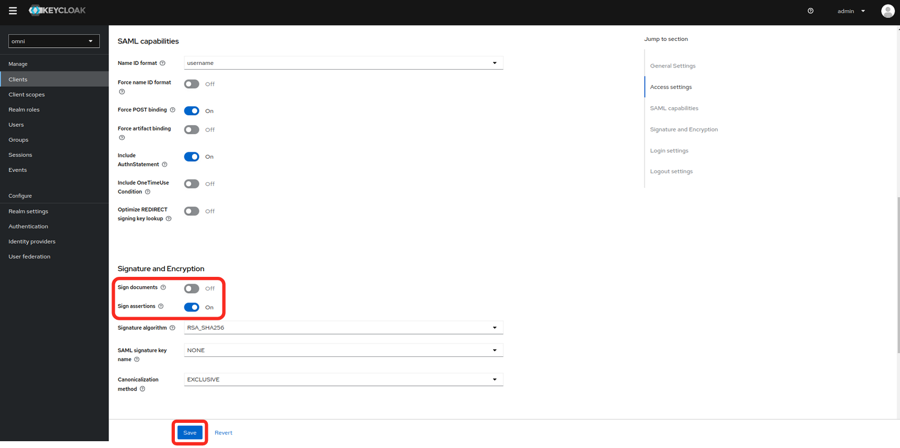
- Modify the Signature and Encryption settings.
- Sign documents: off
- Sign assertions: on
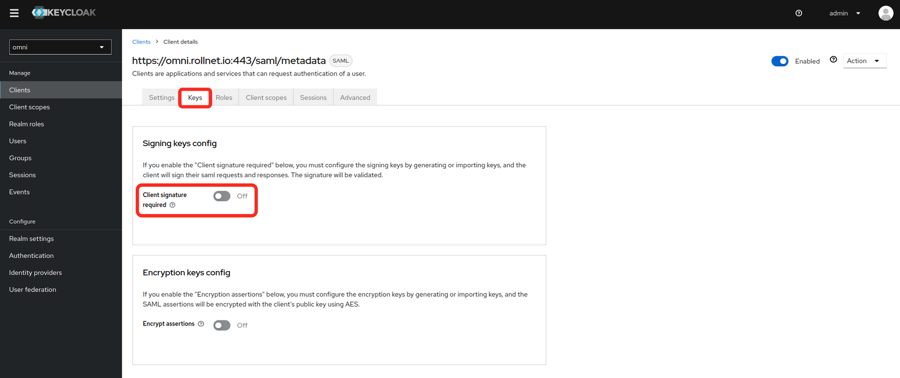
- Set the Client signature required value to off.
- Modify Client Scopes
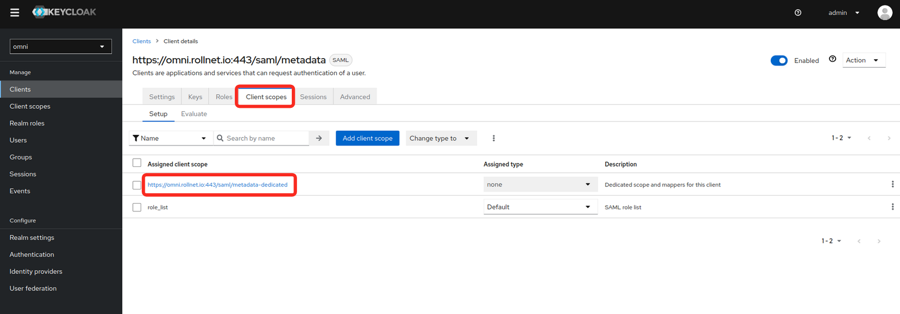
- Select Add predefined mapper.
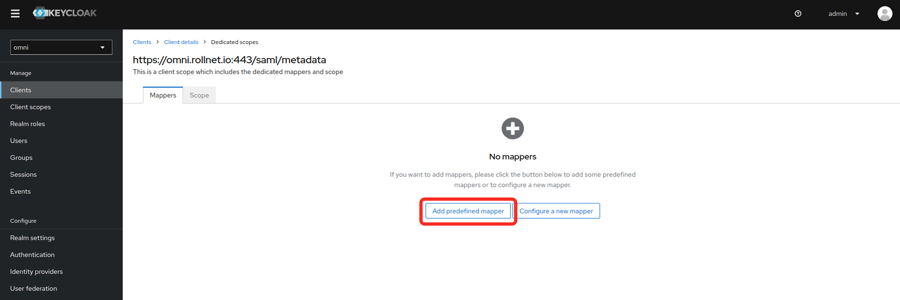
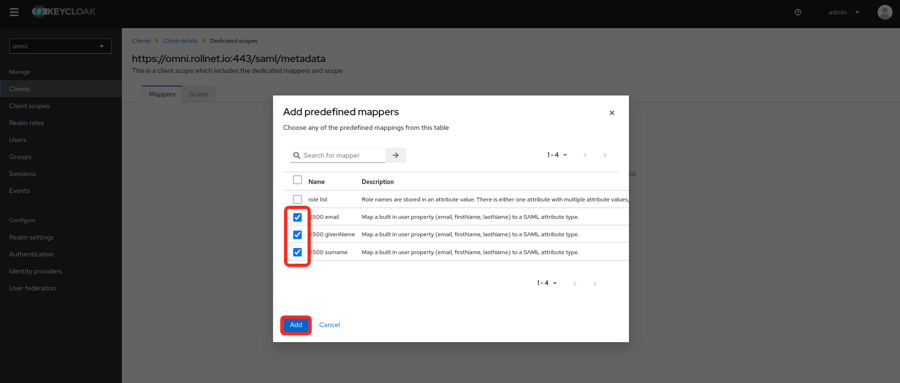
- The following mappers need to be added because they will be used by Omni will use these attributes for assigning permissions.
- X500 email
- X500 givenName
- X500 surname
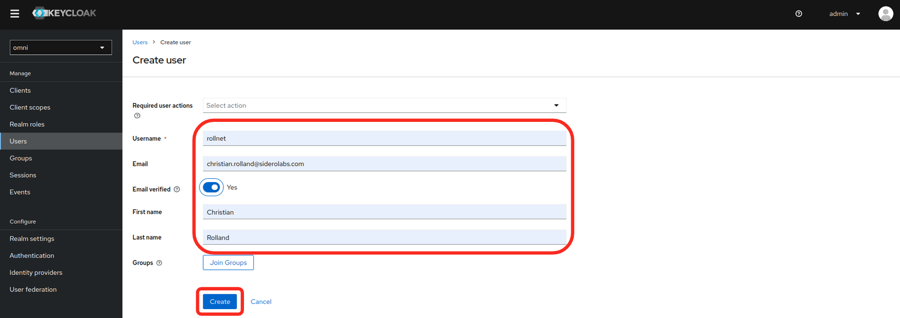
- Add a new user (optional)
- If Keycloak is being used as an Identity Provider, users can be created here.

- Enter the user information and set the Email verified to Yes
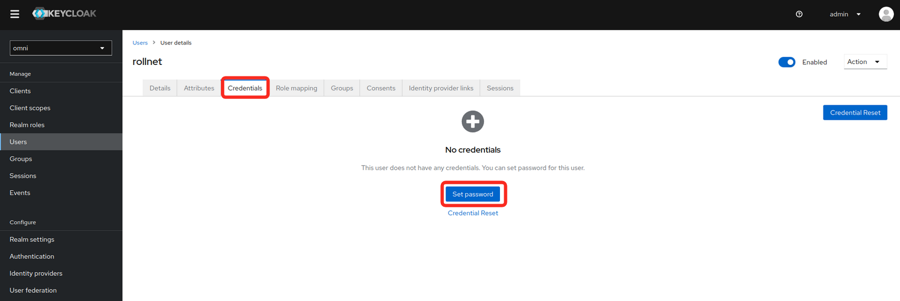
- Set a password for the user.
